
A Wild Sheep Chase
"Almost all the customers in the place were university student couples, neatly dressed and politely sipping their highballs. No girls on the verge of passing out drunk, no hot fights brewing. You could tell that when they went home, they put on pajamas, brushed their teeth, and went straight to bed. There was nothing wrong with that. Nice and neat is fine and dandy. There's nothing in a bar or in the world at large that says things have to be a certain way."
-Haruki Murakami (A Wild Sheep Chase)
Valentine's Day Edition - Oddly Romantic Songs
Say Hi - Take Ya' Dancin'
Our Swords - Band of Horses
The Wedding Present - Mystery Date
I keep telling myself yes, it's true
I really am just sitting here alone with youNo one could have been more surprised than me
When you wrote your number down
and said call me at the first opportunityBecause this does not happen to me
Things like this do not happen to me.
http://rodeorubylove.bandcamp.com/track/im-such-a-creep
Rodeo Ruby Love - I'm Such a Creep
Oh don't you know that I see you in my sleep
I see you in my sleep
Just like lovers do
Oh don't you know that I see you in my sleep
I am such a creep
When it comes to you
TV on the Radio - Will Do
Any time will do, my love
Any time will do, no choice of words will break me from this groove
Any time will do, my love
Any time will do, what choice of words will take me back to you?
Songs: Ohia - Captain Badass
We get no second chance in this life
We get no second chance in this life
So a hot pulse is alright
So a quick pulse is alright
So a hot kiss is alright
So a long kiss is alright
So a long night is alright
And all night is alright
There ain't no contest
Against the final day
We'll rise above us either way
We're either greeted
By life or its reverse
Then each day greeted
By fortune or its reverse
If Only - Fink
Sean Hayes - Baby I Do
Now you're asking
What I believe in
What's the plan, for our lives
I hear you I hear you
Beside me breathing
I got your back, by your side
Dan Croll - Only Ghost
Valley Lodge - All of My Loving
Frightened Rabbit - The Twist
Did you blush then when our hips touched?
I can't tell, you're already red
Am I right? You give me the signs
Is that pink mist or just lit dry ice?
Oh don't tell anyone I'm here
I've got tylenol and beer
I was thinking that you'd call somebody
closer to you
Oh, but your love is such a swamp
You're the only thing I want
And I said I wouldn't cry about it
Jhene Aiko - Bed Peace
I'm Still Your Fag - Broken Social Scene
SketchUp and Solar Power - A Quick Tutorial - Part 2
One thing to keep in mind with a solar installation are the local township laws related to solar.
As a general rule - you want to set yourself a border around the edge of the building where you don't put any solar. Sometimes the roof has a 'lip' that can cause shading -- or the township/building insurace/fire department has rules on how close to the edge you can get.
I'm going to add a 3' border to this demo with one of SketchUp's amazing tools - Offset.


Again we can just type in 3' while using the offset tool to get a border
Now Let's Add the Panels
*** As an added note - At this point you may want to group your entire building into one component or group -- that way nothing that you do to the panels will change the shape of the building ***
You may want to draw your own panels.... but before you do that, you might want to check to see if someone else has already drawn them.. and to scale...
Enter the 3d Warehouse

Many companies and SketchUp enthusiasts have actually uploaded to-scale renderings of specific models - so if you're designing with a specific panel in mind, you could try searching for that model specifically and you may just get it.
But I'm going to be a bit more general...

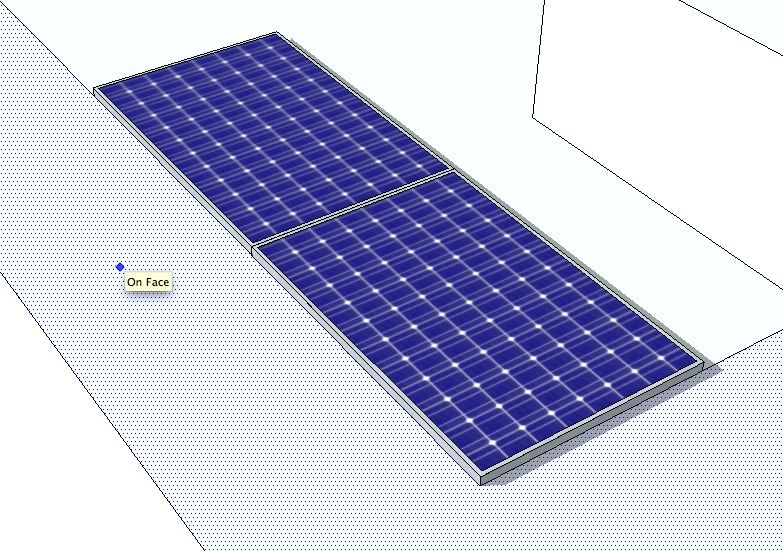
That'll do...
Once you select a model - it'll be dropped at random into your model.

It's hard to tell from this picture - but the panel is currently at a tilt and oriented the wrong direction for the building (remember you're going to want to orient as much to the south as possible - again - this is where a real solar installer can give you the EXACT preferred orientation- but generally you follow the angles of the building as best you can).

So we will need to use the rotate tool quite a bit now.
Since 3D drawing can mess with your perspective, I prefer to move to the edge of the building and use the building lines to rotate against.

First we can lock the edge of the panel to the edge of the building to remove the tilt


Then we can orient the panel so that it'll 'face' south


Now the border lines come in handy for laying out the solar

There are a number of reasons why you don't want to place a solar panel completely flat on a roof. For example, the panels have a small lip around the edges. When it rains, the moisture collects on the panel and then slowly evaporates, leaving behind dust and dirt. This can cut down on efficiency across the panels.
The amount you tilt the panels will depend on the racking you use and the actual location. For the purposes of this rendering, I'll use a 30 degree tilt.


Just like with placement, you can type in the degree of angle.
We plan to cover the roof though, and it's easier to work with the panels while they're flat - so let's undo the tilt for now

SketchUp has an amazing 'copy' tool - which you should use instead of the Ctrl-C.
Snag the corner of the panel with the move tool - and then hit 'Option' and you'll duplicate the panel exactly.
In order to replicate a typical racking system, you'll want to put an 1" of space between the panels.

One amazing thing about SketchUp is that it will remember your 1" spacing and automatically jump to that distance when you move future panels.


In the first tutorial I mentioned creating groups or components. As you can tell, the panel model that we imported from the warehouse is actually made of individual lines and planes - but it's been grouped together as one item for ease of use.
We'll do the same thing with this mini-array to populate more panels

We can now copy our little group and start making a longer row

Now we can group our long array - and just like duplicating panels, we can duplicate the row.
Spacing between rows of panels is a precise science - but for the purposes of this demo, we can follow our border line and give 6.5' of space.
Here is another cool SketchUp trick:
1. Grab the bottom corner of the array that is touching the border with the Move tool
2. Hit option to create a copy
3. Start moving the duplicated array backwards along the border and then enter 6.5'
4. Now enter 5x -- this will repeat the copy and move backwards 6.5' action five times

How. Amazing. Is. That.
Now you'll want to delete that last row... and now that your array is spaced out, you'll want to go through and adjust your array so it's a little better centered on the roof.
As you can see - a lot of the panels are merged into your HVAC units. We're going to want to go through and delete some panels.

First, you'll need to explode the groups of arrays that you made earlier so that you can delete individual panels
SketchUp allows you to 'hide' elements. You can 'hide' the tops on the HVAC units so that you can make sure to delete all panels being hidden within them. We used transparency earlier because we wanted to continue to work on and with the 2D building but in this case, we want the tops of the HVAC units to temporarily not exist and get in our way.

Once you've cleared out all the hidden panels you can batch 'unhide all'.

So now you have the max number of panels that you can physically fit on the roof (taking nothing else under consideration).
At this point I've forgotten how many I put on there... but there is a quick trick to get a count...

Click on one of the panels and select Entity Info

And it gives you a count of your panels
So now let's check out the actual layout and get ride of panels that are obviously going to be in shade.

Before

Aside from the obvious shading, you also want to be conscious of wire runs, string configuration and the cost of racking. There are a few places where you can set one individual panel by itself, but cost-wise, it's usually not worth it.
So now we have a new count -54 panels

So now you have a render that you can present to a client. With your tilt, panel type and count you can give them a rough calculation of how much power you can give them.
54 panels sounds like a lot - but even so, it probably won't cover the energy usage of the building. That's one of the reasons renderings are so important. You don't want to sell the client more than you can actually realistically build.
SketchUp is amazing.
SketchUp and Solar Power - A Quick Tutorial - Part 1
In my past life, I did a lot of SketchUp drawing. For obvious reasons, I'm not able to share the drawings I did for my last company. But I'm currently sitting in on a SketchUp for 3d Printing workshop and I wanted to make a little tutorial walkthrough on a few amazing things about SketchUp and Solar.
Why Render for Solar Power?
Well the obvious reason is so that the client can see what their roof is going to look like. The less obvious reason is Google SketchUp can geolocate -- which means that you can quickly render something close to scale that shows shading though out the day.
So let's put some solar on my favorite local coffee shop
SketchUp is a free tool - developed by Google and taken over by Trimble - that harnesses the amazing power of google to render 3D drawings. And the version I am using, SketchUp Make is free.
So first - let's load up SketchUp. The standard template gives you a little guy (it used to be a blond woman about a year ago... curious) and a plain workspace.

So let's delete the man in khakis and look for my favorite coffee shop.

How Amazing is Google?

Ah. There she is. Let's import her and try and build up the building.

We're going to want to trace the 2d building outline


You can combine the two 'boxes' that make up the building by deleting the separating line


As you can tell, the screen shot noise was getting me some stares at the workspace.
The next logical step is to 'raise' the building - so that you now have a 3D object instead of a 2D one. Resist that temptation though.
If you noticed, the building had a number of HVAC units sitting on the roof. It's unlikely that Rooster and Moon is going to want to remove them for solar -- so we need to add them to our drawing and work around them for solar placement.
So before we go 3D, let's make the background transparent and draw those units in. (don't just delete the background - you'll need it soon)
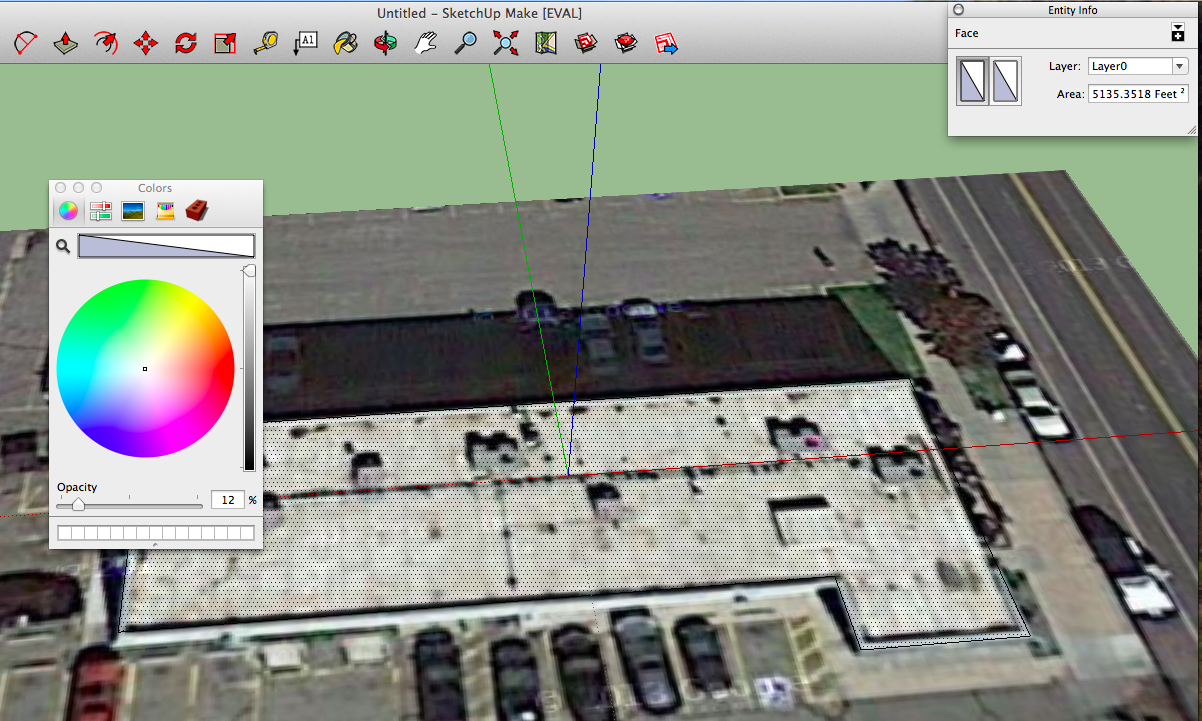
Before we trace out the hvac units - let's make sure we're on a top down view. 3D rendering can really mess with your brain.

We're going to trace out the boxes. In a real construction situation, we'd want to get actual measurements from someone in the field. Often google images are outdated, so some of the units may have moved or been removed. But for general planning purposes, we can guess-timate.


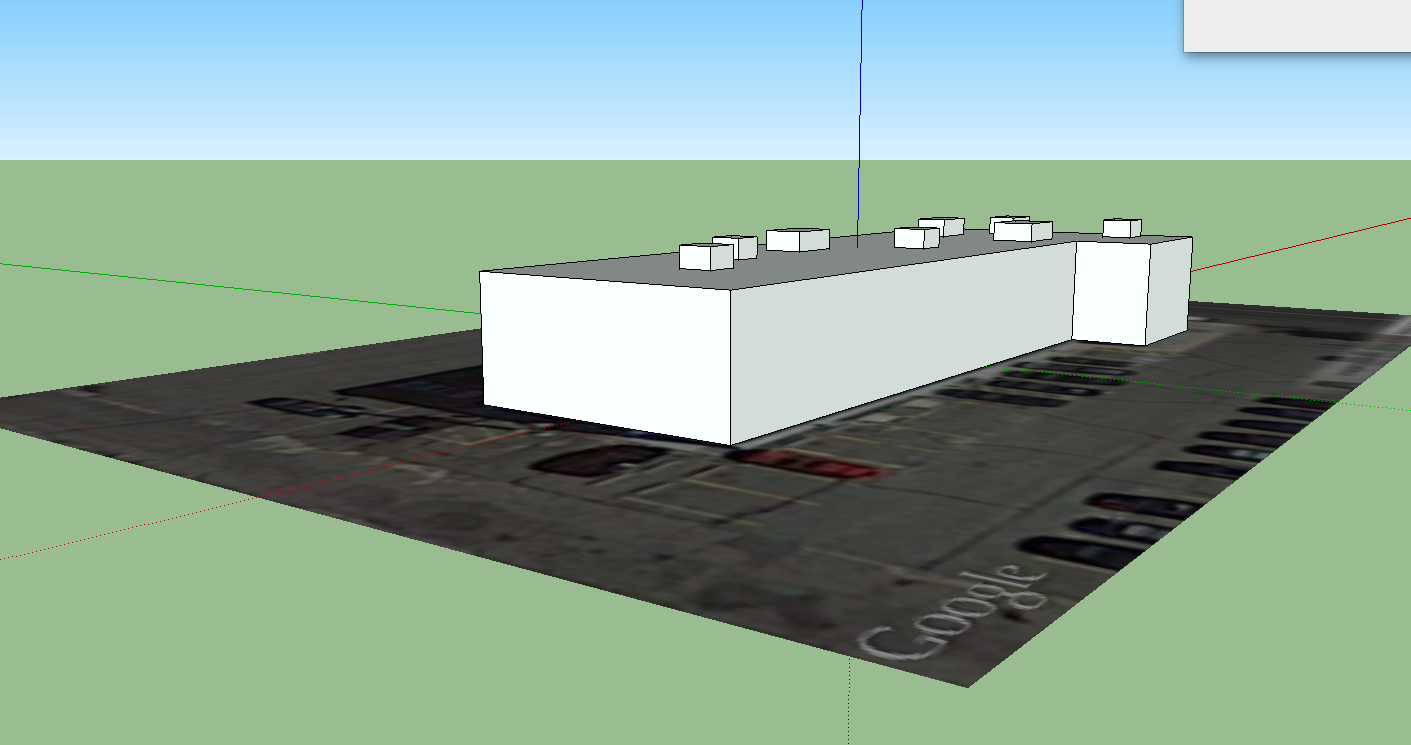
Now that we have our layout - I'm going to 'pull' up the building. I'm going to estimate that the building is, say, 17' tall and that the units are 3'.

In the real world, the actual height of the units is very important. The height of the building is less important, unless you are working with a sloped roof.
With any tool in SketchUp, you can enter a measurement during or immediately after you've made an action. So when I start the 'pull' up the building, I'll pull it up a little bit and then type in 17', and SketchUp takes care of the rest.


Oops. I entered 15' instead of 17'

No problem - I can pull the building up another 2'
So why does it matter how tall I make the HVAC units?
Because SketchUp can render shading. And shading is the enemy of solar.
Basically, if your panels are shaded during prime solar hours, you will have massive losses of productivity. This is important information for qualifying for solar grants -- but also generally the difference between profiting on your green installation or losing major money.
There are ways to work with shading... such as using microinverters, which are individual inverters per solar panel. But microinverters are generally more expensive and almost constantly require repair. There are also hours of the day and times of the year where the solar gain is minimal, and you really don't care if you get shade at 4pm in December.
Making those calls and calculations is why you hire a solar professional.
But for the purposes of this demo, I can show you how to see the general shading that you're looking at.


First - turn shadow rendering on - and then you can go ahead and toggle the Shadow Settings to see different times of day and different days of the year

